IP Tables Setup
BACKGROUND
There are many IP Tables guides
for Linux. Some are simple, some not.
When I first learned about CD recording,
I learned how to burn by the same methods I present in this text.
It helped me greatly. I hope
this can help you the same way the CD burning document helped me.
Note: This assumes you know NOTHING
about IP Tables.
It does assume you have the kernel
source.
Instructions
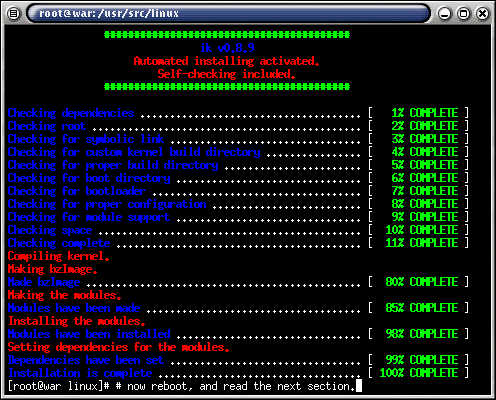
Step 1 of 3 - Set your kernel
options as they are set in the pictures.
Picture 1 of 6

Make menuconfig lets us choose kernel options.
Picture 2 of 6
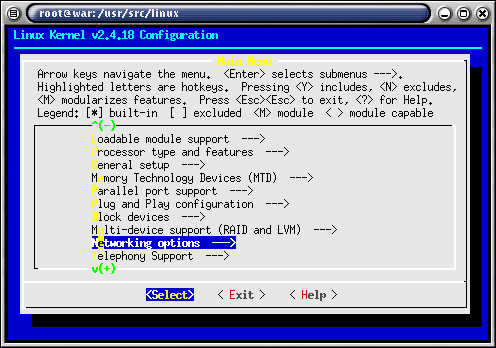
Select networking options.
Picture 3 of 6
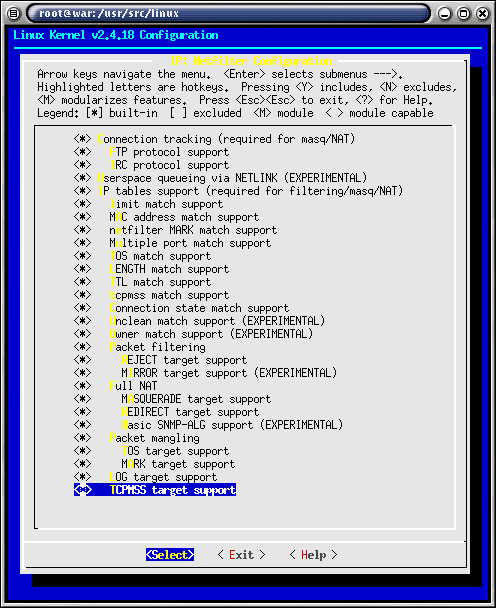
Compile all IP Tables options in.
While you may not be using all of them.
When it comes time to use a special IP Tables
option, you will already have the driver compiled in for that option.
Picture 5 of 6

Picture 6 of 6
Step 2 of 3 - Configure a simple
IP Tables script.
Copy and paste, or download the script without
comments.
Simple IP Tables
Script v0.1
#!/bin/sh
#
#######################################
# Simple IP Tables script v0.1.
# What this script does:
# Block all inbound connections which were not
first initiated outbound.
# Setup MASQUERADE for your LOCAL AREA NETWORK.
#######################################
# STEP 1 - SET VARIABLES
#######################################
LB="lo"
# This is your local loobpack interface.
LAN="eth0"
# This is your private network interface.
INET="eth1"
# This is the interface of your internet connection.
LIP="192.168.0.1"
# This is the IP of your private network interface.
LSAT="192.168.0.0/24"
# This is your local area network.
IPTABLES="/sbin/iptables"
# This is the path to iptables.
#######################################
# STEP 2 - TURN ON IP FORWARDING
#######################################
echo "1" > /proc/sys/net/ipv4/ip_forward
# This turns on ip forwarding in the kernel.
# echo "1" > /proc/sys/net/ipv4/ip_dynaddr
# Uncomment if you are assigned a dynamic
IP address for the Internet.
#######################################
# STEP 3 - FLUSH EXISTING RULES
#######################################
$IPTABLES --flush INPUT
# This flushes any existing rules in the INPUT
chain.
$IPTABLES --flush OUTPUT
# This flushes any existing rules in the OUTPUT
chain.
$IPTABLES --flush FORWARD
# This flushes any existing rules in the FORWARD
chain.
#######################################
# STEP 4 - SET DEFAULT POLICIES
#######################################
$IPTABLES -P INPUT DROP
# This drops any inbound connection until
we get to step 10.
$IPTABLES -P OUTPUT ACCEPT
# This flushes any existing rules in the INPUT
chain.
$IPTABLES -P FORWARD ACCEPT
# This flushes any existing rules in the INPUT
chain.
#######################################
# STEP 5 - CREATE DEFAULT BLOCK CHAIN
#######################################
$IPTABLES -N BLOCK
# This creates a chain called block.
$IPTABLES -A BLOCK -j LOG --log-level 3 --log-prefix
"BLOCK: " # This logs
any packets which do not match step 10.
#######################################
# STEP 6 - SETUP MASQUERADING
#######################################
$IPTABLES -t nat -A POSTROUTING -o $INET -j MASQUERADE
# This does full NAT for your LOCAL AREA NETWORK.
#######################################
# STEP 7 - ALLOW LOCAL ENTITIES
#######################################
$IPTABLES -A INPUT -i $LB -j ACCEPT
# This allows your local loopback device,
you want this on.
$IPTABLES -A INPUT -i $LAN -s $LSAT -j ACCEPT
# This allows any ip address in the 192.168.0.0 subnet.
#######################################
# For the un-initiated, that means it allows 192.168.0.1..2...3..to..255.
# STEP 9 - ALLOW INET TRAFFIC
#######################################
# $IPTABLES -A INPUT -i $INET -s 208.10.20.5/32
-p tcp --dport 22 -j ACCEPT #
This allows SSH from IP: 208.10.20.5.
# $IPTABLES -A INPUT -i $INET -s 208.10.20.0/24
-p tcp --dport 80 -j ACCEPT
# This allows web access from 208.10.20.(0-255)
# $IPTABLES -A INPUT -i $INET -p tcp --dport
25 -j ACCEPT #
This would allow connections (TCP) to 25 for a mail server.
# $IPTABLES -A INPUT -i $INET -p tcp --dport
113 -j ACCEPT # This would
allow connections (TCP) to 113 for identd.
#######################################
# STEP 10 - ALLOW IN WHAT WE SEND OUT
#######################################
$IPTABLES -A INPUT -m state --state ESTABLISHED,RELATED
-j ACCEPT # This is the stateful inspection
command.
#######################################
# It only allows in what you send out first.
# STEP 11 - SETUP REDIRECTS
#######################################
# $IPTABLES -t nat -A PREROUTING -i $LAN -p tcp
--dport 119 -j DNAT --to 148.78.248.75:119 #
This redirects packets.
#######################################
# Basically, it means any packet that goes
to the firewall box
# STEP 12 - DENY EVERYTHING NOT ALLOWED
# on tcp port 119 will be re-reouted (DNAT)
to 148.78.248.75:119
#######################################
$IPTABLES -A INPUT -j BLOCK
# This blocks unauthorized connections and logs them with the prefix "BLOCK:
"
#######################################
# in /var/log/messages.
Step 3 of 3 - Configure the script
to your settings and run the script
1] Edit rc.firewall to your specifications.
2] Make executable, run the script and you're
off!
[war@war war]$ chmod +x rc.firewall
[war@war war]$ ./rc.firewall
You're done!
Try pinging yourself from a shell
account, you will see blocks in /var/log/messages.
Make the gateway of a client
machine on your LAN the IP of the Linux box, NAT should be working.